Viewing entries in
Healthy Cooked Foods

Comment

Pass the Butter, and the Salt Please

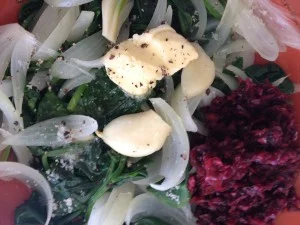
Grass fed, organic, grain fed, salted or salt free? Last night I ate two pieces of sourdough toast with gobs of butter. Not just any butter, mind you – I ate salt free organic pasture butter. Although I love the taste of butter and do not feel it is “bad” for me, it is not often that I get into a butter frenzy.  Gosh it was good. I let the toast cool a bit before lavishly covering it in butter. This way it stayed somewhat firm, but not hard. It was divine.

Did you know that your vegetables are much healthier for you when they are accompanied with a little saturated fat from butter? It is true. That’s all you really need on veggies to be in heaven. I am not sure why people don’t know what to do with vegetables. All you need to do is cook them, put butter on them and top with a dose of salt. That’s it.

Many of you reading this may think that butter is the forbidden food and that it is fattening, or that it clogs arteries. I used to think that until I started educating myself about more of the traditional diets and culinary practices.  To inspire you, I decided to do some research. I could make this article long and footnote many facts, but instead, I am going to simplify it and provide you with the highlights l think are important.

Here is what I found:

  1. We need a good source of saturated fat. This is why coconut oil is back on the scene, and butter is coming back from the grave that margarine put it in. Being that margarine is made in a factory, and often with less than excellent ingredients, it is no longer the hero of butter replacements.
  2. Grass fed or pasture butter has more nutrients than butter from grain fed cows. This is because the cow ate grass instead of grain, which is a far better source of food for a cow and quite possibly a human too.
  3. Grain fed cows from conventional feedlots are fed grain and corn that is predominately GMO. In addition the cow holds toxins like dioxin (a pesticide) in the fat tissue. So, if you are consuming non-organic grain fed dairy products, they are probably high in toxicity from pesticides and herbicides from the feed.
  4. Cows fed organically grown grains are still compromised by the fact that they were not meant to eat grains, but at least the grains are not GMO. The feed is grown organically, which means less toxicity - better for you and better for the soil.
  5. Pasture butter is higher in nutrients, but can also be high in toxicity if pesticides, etc. have poisoned the soil that the grass is grown in. If the grass is organically grown in clean soil, then it could be your best choice all around. But, if the cow has grazed in grass from toxic soil then, although it has more nutritional nutrients, it could have a lot of pesticide chemicals from the grass and soil.

So, what does all this mean? I prefer organic pasture butter. If it is not available, then go for organic all the way.

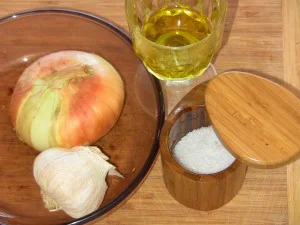
Oh gosh, we haven’t even talked about salt yet. If any of you have my DVD series, you know that I am a girl that is all about salt. “Salt on top, never in” is my motto. Many chefs advocate, “always in, never on top”.

Here is why I don’t like to cook with it, and prefer it to be used after cooking. I love to preserve the taste of the food without salt. There are exceptions of course with soups, stocks and some sauces, yet most food is so tasty in the buff. When the addition of an excellent salt is added just before consumption, you get both flavors on the palate. This is what makes an Orgasmic bite. Of course, iodized salt, stripped of its natural nutrients does not deliver the big O. Orgasmic bites come from excellent salts dried in the sun in clay beds, with all the minerals the sea gave it still in tact. Celtic Sea Salt is my favorite.  Trust me, there is a difference.

When I go to a great restaurant and a huge basket of bread is delivered I am excited to no end. Often though, my delight is blown away when I dip into the butter and find it soft, warm and salty. Dang, I want salt free rich butter that tastes like “butter” when I have warm fresh bread. When this happens to me, I ask for a small bowl of olive oil.  At least then I get to enjoy some of the bread.

So, I probably do not need to go any further about salt and butter. Salt free is the way to go to get the most delicious butter. And, if it is pasture grazed, then all the better. The color will excite you, the texture will please you, and the lingering flavor will devour you. Yum.

How about you? Do you love butter? What is your favorite kind?

Comment

Comment

Turmeric & Pepper for Great Flavor & Benefits

Lately I have been dealing with some pain in my right groin area where my Psoas muscle is. A few years ago I sprained my Psoas rather brutally, and it challenges me ever since. Anyway, when I get off course, do not stretch like I should and/or enjoy too much red wine, I begin to hear it talking to me. I have tried MSM, and systemic enzymes. They all seem to help and I keep it under control. But, lately, I just can't seem to remember to take the pills. In an effort to try something new, I decided to give turmeric, with the powerful curcumin nutrient in it, along with black pepper, a go. I read that black pepper enhanced the potency of curcumin by something like 2000%. Wow, I thought.

I began experimenting. First of all, fresh turmeric is all over Maui. I can find it in the stores and at the farmers markets. When I was on the mainland in California I could not find it it the best of grocery stores. Perhaps they have it now. In any event, some of the fresh turmeric powders will work as well.

There is a lot of research out there about the healing qualities of curcumin for inflammation and with anti-cancer diets.  There is also a lot to be said about what to eat it with, and how to get the best absorption from it.

Some say that it should be taken with a bit of olive oil to increase absorption. Dr. Mercola says to combine a tablespoon of curcumin powder with 1-2 egg yolks and a teaspoon or two of melted coconut oil. Then he advises to use a hand blender on high speed to emulsify the powder. Does that sound yummy to you?

I remember hearing years ago that I should take the turmeric with some sort of fat, or drink some milk or something like that (cottage cheese, yogurt, etc.) with it to enhance absorption. I can't seem to find out why the olive oil is suggested.

In any event, in my rebellious thinking, I decided from all this material that I am going to get it down the best I can while enjoying it as much as possible, and it appears that combining it with a good fat source could be what it needs.

Here is what I have been doing:

1. I got a small container of both turmeric powder and pepper and have been carrying it with. Don't laugh.

2. The other day, while out, I purchased a small container of yogurt (whole milk of course) and sprinkled my little mixture on it. What is good, you ask? Well, not that good. If I would have had some honey, it would have been better.

3. I have also been making lots of Kitcheree and other soups with fresh turmeric and now pour on the pepper lavishly.

4. The onion & garlic mixture in the last blog post is also great with the fresh and/or powdered turmeric and pepper, of course. Ginger is another warming, digestive, immune building food that tastes great in this mixture.

4. Warm goat milk. Yep, it is true. I get this incredible fresh raw goat milk from some local farmers. One day when I looked a little frazzled, the farmer told me to warm it and add a teaspoon of ghee, a pinch of nutmeg, cinnamon and honey. She told me it would be a good tonic to relax me. Wow, ghee in hot milk. That sounded so decadent. If you know me, then you know I love decadence. So, I gave it a try and loved it. It went down my sensitive tummy so easily and enjoyed it's journey through my body. You know a food is good for you when you are still enjoying it after you have consumed it.  Then I tried having it in the morning and one day got brave and added turmeric and pepper. YUM!

5. By now I am really started getting creative. Today I made a hot cup of Mate (see pic above). I added a Chai tea bag and some powdered turmeric, cinnamon, nutmeg and pepper and let it brew. When it was ready I added a teaspoon of ghee and then whipped in some fresh cream (any milk will do). OMG! Do not underestimate the power and taste of ghee in your hot drinks. Yum!

6. Making tea and adding both powdered Turmeric and pepper is another new ritual.

7. My smoothie even got a hit of the turmeric. My green smoothie tastes great with the fresh along with a a scoop of cultured veggies and a dash of pepper. And, my goat milk smoothie with vanilla flavored protein powder is quite good with a dash of cinnamon, nutmeg, turmeric and pepper. Any nut milk will do.

The best news is that I am having fun, my Psoas does not hurt at all and I am enjoying these warm foods enormously. My skin has turned yellow though (just kidding).

So, it is probably much colder where you are, so this could be the time to enjoy some new flavors and boost your immunity while decreasing inflammation.

Do you have any ways that you are enjoying these foods. I would love to hear from you!

In case you would like to view my new course on Ayurveda foods, please go to: Ayurveda and learn to make kitcheree, onions and garlic, agni tea, and other fabulous Ayurvedic veggies recipes. Warm your soul!

IMPORTANT: USE THE Coupon Code: Chef Teton

NOTE: All my new courses are hosted on Udemy.com. When you purchase there, it is vitally important that you use the coupon code: Chef Teton. Udemy will require you to register with a login and password, which means that is where you will always go to use the course once you have purchased it. They will not require a registration if you are just browsing.

Comment

1 Comment

Onions & Garlic for Immunity & Great Flavor

It is winter time, which means it's time to boost our immunity to keep us strong and well. This is such a simple recipe, easy to prepare and always delicious.

Onions and garlic are known to be immune builders. They are full of nutrients that are known to wean a cold. The best news is that they are delicious.

I found a way to make them easily, and then they are always ready for me to grab a spoonful to accompany any meal. Try a scoop on a piece of toast with cultured veggies.

All you need to do is rough chop an onion or two, throw in lots of garlic cloves (peeled or not), a tablespoon of olive oil or coconut oil or blend a little of each. Sprinkle some salt to taste.

Put them on the stove on a very low heat and them slow cook over time. The water from the onions will release into a juicy gravy.

Enjoy this mixture as is, or along with your meal as a condiment or side dish. They will blend well with any steamed veggie, or along side meat, tofu, eggs or tempeh.

Store in the fridge and enjoy a little each day.

More immune building options: Add turmeric (fresh or ground) with lots of pepper. See my next blog post on the value of this combination.

Also, if you are interested in watching how I make this delicious dish, and want to learn more about herbs and spices and Ayurvedic Cooking, Click here to see my new course on Ayurvedic Cookings. IMPORTANT:

Use the Coupon Code: CHEF TETON when you purchase.

NOTE: All my new courses are hosted on Udemy.com. When you purchase there, it is vitally important that you use the coupon code: Chef Teton. Udemy will require you to register with a login and password, which means that is where you will always go to use the course once you have purchased it. They will not require a registration if you are just browsing.

1 Comment

2 Comments

Banana Tea + Banana Snack

I have to give Dr. Oz the credit for this one. I happen to turn his show on the other day and found an awesome segment they were doing on sleep formulas. Boiling bananas to make banana tea was one of the ways.  

Banana tea is full of magnesium and potassium to help your body settle down and fall back to sleep. As stated on Dr.Oz's website:

"Studies have shown that magnesium can be helpful in preventing you from pulling yourself out of sleep, and the potassium and magnesium help your blood vessels and muscles relax."

Well, I am probably not going to get up and make tea if I wake up in the middle of the night, but I loved the idea of this recipe for several reasons:

1. My body is always in need or more magnesium. I get leg cramps easily if I don't get enough veggies and greens, which are full of the magic mag!

2. I love the taste of the tea, and the bananas cooked.

3. How cool is it that you can then eat the WHOLE banana. Yes, that's right. Once cooked the banana peel is not only nutritious, but taste great, and is loaded with fiber and vital nutrients.

4. The banana when boiled for 10 minutes is warm and lovely. With a little cinnamon, like in the picture here, you will have a wonderful snack or dessert - peel and all.

5. No more wasting away of banana peels!

6. I live in Hawaii, which is banana land. We are always looking for new ways to enjoy this incredible fruit. Now I am thinking of melting some butter or coconut oil over it. yum!

photo-87

The water is boiled and then poured in a cup and sipped. It was good when cold too.

Here is the recipe from Dr. Oz's website:

Banana Tea

Ingredients

1 raw banana 1 small pot of water Cinnamon (optional)

Directions Boil water. Cut off both ends of banana and place in water. Boil for about 10 minutes.

Pour water through colander and into mug (I do not pour through a colander). Drink one hour before bed.  (Chef Teton says anytime of the day is good, but if you are using it for a sleep aide then evening is best).

If you're feeling adventurous, you can also eat the banana and its peel an hour before bed. For an extra flavor, sprinkle with cinnamon!

2 Comments

Comment

Egg Plant Parmesan Vegetarian- Gluten & Pasta Free

EPMealWide See this amazing dinner for 10 to 12 people? It looks delicious, right? The good news is that it is more than delicious, so simple and healthy too.

Last evening I was up at my friend's farm in Kula. They had just harvested egg plant, broccoli, green beans and peppers.  My friend, Marta, is a creative genius in the kitchen. She always has her master artistic hat on as she steps into a well stocked pantry loaded with the best and healthiest organic ingredients. Seriously, this dish even provided the perfect pupu before we dove into the main meal.

Here is how it starts:

EPPlainEggPlant First wash and slice the egg plant. As you can see by the picture here they are sliced into about 1/3 inch thick rounds. No need to do anything else to it with salt, pre-baking or anything like that.

Ingredients for a large serving (use less for smaller servings):

Small bowl (1 cup) of coconut oil - softened to a liquid state.

1 & 1/2  cups almond meal

1 & 1/2  cups shredded Parmesan cheese

1 jar organic pasta sauce of your choice

Mozzarella cheese for topping

EPCoatingEggPlant

Combine the almond meal and Parmesan cheese into a bowl and fluff together to make a mixture to coat the egg plant rounds with.

Begin by dipping each egg plant round, one at a time, into the Coconut Oil. Coat each one thoroughly.

Then coat each coconut dipped round with the almond meal and Parmesan cheese mixture. After each piece is covered with the mixture, place it on a cookie sheet, hotel pan or a casserole dish (at least one inch deep).


When they are all assembled on the cookie sheet (one layer), bake in an 350 degree oven for about 20 minutes, until they are golden brown. See the picture below for those that we left in the oven longer to get extra crispy, providing us a lite pupu while we waited for the meal to be complete.

EPCrispyEggPlantP This picture is of the rounds that we baked a longer (about 30 minutes) allowing them to get dry and crispy. Seriously, we could have stopped here. These were amazing. Topped with fresh chopped parsley, these make a great hor'dourve or pupu.

When the rounds are golden brown (sooner than those left in longer to get crispy), remove them from the oven and pour the red sauce all over them and then top with Mozzarella cheese.

Put the tray or dish back into the oven and bake for another 20-30 minutes until hot and bubbly. The Mozzarella should be melted.

While the main dish is cooking, wash, chop and cook vegetables of choice. In the picture above we have broccoli, string beans and some fresh peppers. We sauteed them in a little coconut oil for about 10 minutes. Usually a teaspoon or two will do depending of how many vegetables you are cooking at once. The taste is altered negatively if you use too much. After they have cooked for several minutes, stirring often,  add a little water to let them steam up and soften. Total cooking time about 15 minutes.

EPVeggiesEach person served the egg plant dish on top of their greens, like a pasta dish, but without the pasta!

What a great meal!

Comment

Comment

Cooked Beets with Pine Nuts

Beets&PinenutsBeets seem to be coming out of my ears lately (not sure where that saying came from, but I know you know what I mean). Being a foodie, people constantly give me food, but I am not complaining. It gives me more inspiration to be creative while I must always  'keep it simple'!

One of my new favorites with beets is a simple one. Cook the beets in a little water.  About half way through their cook add the beet greens to the top. Cook until all of them are tender the way you like them.

While the beets are cooking take a tablespoon or more of pine nuts and grind them into a crunchy type powder. Use a coffee grinder,  Vita Mix, or blender to break them down. I have a special coffee grinder just for my nuts and seeds.

Remove the cooked beets and greens from the pan with a slotted spoon and place them in a bowl.  Top with Celtic Sea Salt, pepper and pine nuts. You will love the nutty flavor and fat that the pine nuts provide.

This makes for a wonderfully healthy, delicious and fulfilling side dish, morning or afternoon snack.

Making every bite count,

Chef Teton


Comment

3 Comments

Pumpkin Seeds In Coconut Oil

TetonPumpSeeds

Pumpkin Seeds sauteed in coconut oil, sprinkled with sea salt are one of the post popular things I have ever made. Everyone loves them anytime, anywhere!

They are perfect for a party or when a few guests arrive. And, they make great gifts. The best part is that they taste fabulous by themselves or on anything you make, especially salads. They add this salty earthy crunch! See below the recipe for some ideas. Seriously, they just make every dish!

Ingredients

2 cups Pumpkin (or Pepita) seeds 1 tsp Coconut oil (Barlean's is best)

Celtic Sea Salt (fine ground)


Pumpkin seeds can be toasted or roasted in a pan, the oven and/or a toaster oven.

Skillet: Put a small amount (1/2 to 1 tsp) of coconut oil in the pan after the pan is hot. Pour the seeds in the pan and stir often. This is not a food that you can leave on the stove. You must stay over it while tossing and turning. It is sort of like cooking popcorn, but should not get as hot. Just keep an eye on it, turning them often as they cook quickly. They will start to pop. They will not all pop, and it is not necessary that they do. When they start to pop it is an indication that they are hot enough, maybe even too hot, so you may even want to turn down the heat. It takes a delicate balance.

They can be slow roasted as well, but I usually like to roast them within about a 5 minute time. As soon as they are getting golden brown, place them on a plate and salt immediately with fine ground Celtic Sea Salt. Toss, and let them cool before eating.

DO NOT be tempted to nibble on them until cooled as you may burn your mouth. They hold their heat and stay hot for several minutes. When they are cooled, but still sort of warm, that is the perfect time to store them in an airtight glass jar. Storing them soon after cooking keeps them fresh longer.

Oven Method: Quick method: Preheat oven to 450 F. Place a cookie sheet in the oven and let it get warm before you place 1/2 to 1 tsp of coconut oil on the sheet. This way the coconut oil will melt nicely over the entire sheet.

Spread pumpkin seeds evenly on the cookie sheet and bake at high heat until the seeds start to pop. Watch the seeds closely. If the seeds start popping you may need to lower the heat, or stir quite often or they will burn. You may need to remove them from the oven often and stir them around often for even exposure. The oven method is really better for a slower cook, as they can roast slowly over a longer period of time. They will still need to be stirred around often.

Cook the seeds until light golden brown. Watch closely! Remove popped seeds immediately from tray onto a serving dish. Salt and toss.

*Let seeds cool before nibbling on them as they stay hot for a while and may burn your mouth!!

Ideas for topping!

All salads, specifically: The Lemon Tahini Tarmari Dressing (see Recipe HERE)

Vegetarian dishes like: Quinoa and veggies, rice and beans, tofu, eggs and potatoes!

3 Comments

Comment

The Best Garlic Bread Ever!

GarlicToast I love Garlic Toast

Seriously, I love garlic toast so much I could eat it with everything. It really does not matter what it is.

Here is my favorite way to make it:

I like to use sourdough bread – organic of course - because it taste the best and it is a naturally rising bread. You can use French bread, rye or even some of the gluten free varieties made with almond flour, rice or millet. They are all good – just different flavors and textures.

Spread the bread with either olive oil or salt free pasture butter. Or if you want to get decadent mix olive oil and butter together.

Fresh garlic: Use a garlic press to mush the garlic. Put it right on to the bread and spread it around.

Sprinkle Celtic Sea Salt on top of the bread, butter and garlic.

Top with fresh chopped parsley.

If you don't have fresh garlic then garlic powder will do. Be careful with garlic salt as it can get too salty.

If you have some fresh Parmesan cheese handy, use some lightly to give it a rich deep flavor.

Broil until bubbly and crispy.

To store left overs: If there is any such thing, freeze them. When you are ready to enjoy them, warm or  toast them for a few minutes in a toaster or the broiler. Surprisingly they taste almost brand new!


Comment

27 Comments

Coconut Oils Eggs & Butter Slathered Broccoli

My New Breakfast

Broc&Eggs

I was forced to change my ways recently. I am NOT a breakfast eater, so I usually wait too long to eat. Then I often get caught somewhere and have to make less than excellent choices or, my blood sugar goes down and then I am ravenous and will eat almost anything in sight.

Yes, you are not the only one.

So, recently I set out to eat breakfast as soon as food sounded good to me, and sometimes even before.  Instead of my usual piece of fruit and/or something light, I have begun to steam veggies and poach eggs in the same pan.

It has served me well.

Now, I get why they (those Dr. types) say you should eat a good breakfast. Mine is more at brunch time, but regardless, the carbs from the veggies (and sometimes I add a piece of sourdough toast), Cultured Superfoods, the fat from the butter and the protein from the eggs fill me up comfortably and sustain me all afternoon.

Now don't get all wigged out about the butter, and say "I can't eat dairy", consider the dairy source first. It is vital to use organic raw butter from pasture grazed cows. There are so many benefits to the fat in this type of butter it is alarming that it has been given a bad rap. We need a good source of saturated fat, according Weston A. Price's work and many others (see article on coconut oil, another healthy saturated fat). Besides being healthy, do you know what it does to your vegetables? It makes them delicious and it is proven that they are more easily absorbed and healthier when eaten with butter. True story.  If you can't get raw butter where you live then there are many organic pasture butters available. You can also use Organic Ghee, very digestible for many.

I love the way this breakfast provides me a steady flow of energy – no drops that ignite my caffeine craving (God, I love coffee) and no hunger until well into the late afternoon.

This is good. I feel so much more in control.

And, it is so simple. It has got to be simple for me or it is not going to happen, unless I am preparing a dinner for guests, and trying to show off.

Before I launch into the instructions, I want to share that if I eat a whole grain cereal, toast with cultured veggies, or a cultured coconut yogurt/fruit nut combo, which I often do, it does not last me in the same way. The same goes for smoothies (except green smoothies). I am usually so hungry and hour later that I must eat more. This could be OK,  but I usually don't want to take the time for another meal and don't like getting caught so hungry.

It is so inconvenient.

I believe that the reason this breakfast serves me so well is because of the large protein/fat component that satisfies and fuels me. My body seems to feel and look better too with this type of breakfast.  I want to add that I always have a green smoothie and/or some Beet Kvass lurking in the fridge that I drink before breakfast and in the afternoon. I believe it is good to have a lot of "life" in your foods when eating cooked foods.

Ingredients for My New Breakfast (sometimes dinner)

1 serving of veggies of choice: broccoli, Swiss chard, beets and carrots, collard greens, string beans, etc.

2 eggs (pasture is best - organic a must)

Pasture Butter (raw if possible)

Place a couple inches of water in a saucepan. Bring to boil and add in the broccoli, and reduce the head. Simmer until tender. Remove with slotted spoon into a serving dish.

Turn the heat back up in the saucepan with the water from the Broccoli so you can poach the eggs in the same water. You may need to add more water.

Top the veggie with butter and/or oil of choice (Barlean's Flax Oil is delish!). Get it here for 20% off.

When the water is almost boiling add in the two eggs to poach them.  When they are at the desired firmness, remove and place onto your plate. You know, they are much better for you if the yolk is soft and runny. Make sure the whites are cooked though.

Top with sea veggies (dulce or mineral mixture), chili flakes, Celtic Sea Salt and whatever else sounds good to your tummy!

And, although this picture does no show Cultured Veggies, make sure you include them. They will make this meal go down easily and digest to your benefit. The good news, the flavors will be enhanced tremendously!

27 Comments

Comment

Steamed Beets with Raw Pine Nuts & Barlean's Flax Oil

Beets&Pinenuts

Ingredients

1 beet with several leaves of beet greens

¼ cup pine nuts

Celtic Sea Salt

Optional: Olive Oil, Butter or Barlean’s Flax Oil

Wash beets and slice into thin rounds (they cook faster that way). There is no need to peel them. That is a waste of time and more importantly, a waste of nutrients.

In a saucepan, add about 1 or 2 inches of water. Place the beets in first then put the greens on top. Turn the heat up to bring to boil, and then turn it down to cook until tender.  Cooking time is about 10 minutes.

While beets are cooking grind pine nuts in a coffee grinder or blender, making a nice chunky powder.

When beets are tender, remove and place them into a bowl with a slotted spoon (so they won’t be so watery).

Top with your choice of either Barlean's Flax oil (read about the benefits of flax oil here) or butter, and the ground pine nuts. Finish with Celtic Sea Salt. Order Barlean's here for a 20% discount!

Don’t forget to add a hearty scoop of Cultured Veggies!

Comment

Comment

Yummy Vegan Tabbouleh

tabboleh 2Easter Sunday was a blast this year. My friends asked me to make Tabbouleh, so I eagerly obliged. When I realized I had to quadruple the recipe, and that meant a lot of chopping, I recruited my neighbor’s kids for help.

We put on a Disney movie, made a huge mess and had a ball. The Tabbouleh turned out great, and they all learned new skills like squeezing lemons, using the food processor, and measuring.


Here is the recipe to serve 6

Ingredients

1 cup quinoa, rinsed well

1 ½ cup water

8 tbsp fresh lemon juice

½ cup extra virgin olive oil

1 large English hot-house cucumber

1 pint cherry tomatoes cut in quarters

1 cup chopped flat leaf parsley

1/cup chopped fresh mint

2 scallions, sliced thin

1 tsp Celtic Sea Salt

fresh ground pepper

Directions

This recipe can be made a day in advance, or all at once.

Bring Quinoa and 1 ½ cup water to a boil in a saucepan over high heat. Reduce heat to low, cover and simmer until Quinoa is tender, about 10 -15 minutes.

Remove from heat the let stand. To cool, spread out on a large tray or chill.

Whisk olive oil, lemon juice, salt and pepper together in a bowl. When Quinoa is cooled transfer to a large bowl and mix in half of the olive oil/lemon juice mixture. Cover and chill.

Add cucumber, tomatoes, chopped parsley, mint and scallions to the Quinoa mixture. Toss together. Drizzle remaining olive oil/lemon juice over the top and toss again. Season with freshly ground pepper and salt as needed.

dietary makeover banner 2Learn how to revolutionize your life with the new “4-Week Dietary Makeover”, an online course that delivers a dynamic approach for a dietary lifestyle like the Centenarians.  I promise this course will awaken and inspire you with a diet delicious enough to last a lifetime.

At age 67, I finally found the right combination of Raw, Cooked, and Cultured Foods. Join me as we journey ahead with strength, vitality and fun.

Click here to learn more.

Comment

3 Comments

Coconut Curry with Veggies & Tofu

I always thought of curries being too difficult for me to master. In other words, I never thought I could make them as delicious as those I had in restaurants. I was born into a simple American food household. Our traditional meals were barbecued steak, baked potatoes, salad and garlic bread; spaghetti with salad and garlic bread, ham hock and beans, tacos, burgers, and creamed tuna on toast.

Breakfast was cold cereal; egg on toast, and the occasional brunch of fried sweet potatoes, bacon and omelets.  Lunch was a tuna or egg salad sandwich. Pretty simple. No wonder I keep my meals so simple. I was raised with simplicity.

So, it turns out coconut curry is pretty easy. There are many different curry spice mixtures (often called Masala’s) and tons of variations. The recipe below provides a good start.  Don’t be afraid, you can’t go wrong. Jump in 

Ingredients:

1-2 cans          coconut milk (do not get low fat coconut milk – it tastes terrible and has had more processing, which is unnecessary)

1 pkg              firm tofu

1-2 cans          water (1 can for each can of milk)

2 tsp                curry powder (more to taste – depends if curry powder is hot or mild)

1 tsp                or more of salt to taste

1                      onion - chopped

2                      cloves garlic - minced

1 inch              ginger - minced (or grated ginger juice)

1tbsp              coconut oil or Ghee

Vegetables of choice (carrots, peas, potatoes, beans, etc. 

Directions:

In large saucepan heat oil or Ghee. When hot add in onion, garlic and ginger. Sauté until almost translucent. Add curry powder and salt, and sauté for a few more minutes until the herbs are all blended.

Add in coconut milk and water. Heat until liquid is almost to the boiling point. Add in vegetables, the firm ones first.  Cook on medium heat until the vegetables are just less than the desired tenderness. Remember, they will keep cooking when you turn the heat off, so take this into consideration when testing the veggies. Mushy veggies are no good.

Serve in a bowl on it own, or on a bed of rice.

Some condiments that are oh so yummy on curry:

Coconut flakes

Raisins

Peanuts

Cashews

Bananas

Avocado

I like to set out small bowls of each and let people build their own mountain of yummy condiments.

3 Comments

1 Comment

Winter or Summer Squash a la Coconut Oil

Recent research has made it clear just how important winter squash is to antioxidant intake, especially because of the carotenoid antioxidants. No single food provides a greater percentage of certain carotenoids than winter squash. One study determined winter squash to be the number one source of alpha-carotene and beta-carotene among certain cultures and populations segments that thrive. In addition to the carotenoid content these delicious foods are full of another powerful antioxidant, and that is that they are a very good source for vitamin C in winter. They are also full of anti-viral, anti-bacterial, and anti-inflammatory substances found in these delicious succulent foods.

The best part is that they have just enough starch in them to make my eyes twinkle with anticipation of my first and last bite!

Bake

This is how I like them best. Bake them whole or cut them into pieces like the picture above. Yes, I know, it takes some strength to cut them. If you cook them whole they will be easier to cut after cooked. But, if you have the strength to cut them, it is good to de-seed them as some of the seeds can cause a little more of a bitter taste. I always say, go the easy route.

The picture of squash in this post was lavishly topped with fresh sage before cooked. While cooking it was basted with coconut oil and salt.

Boil/Steam

The same goes here for cutting the squash. Place in pan with a little water and/or a steamer. Be careful not to over cook. Squash cooks fairly quickly. When your fork goes into the flesh easily, remove from heat and hot pan immediately, otherwise the flesh gets too soft and looses it’s flavor.

Toppings

Coconut Oil is fabulous.

Barlean’s High Lignan Flax Oil is another great taste.

Stryian Pumpkin Seeds Oil is to live for.

Butter or Ghee

Could it be that simple?

Yes, please don’t think you need to make recipes that include a lot of ingredients or spices. Their uniqueness is often overtaken with other flavors. When you take fresh foods out of the oven or sauce pan, all you really have to do is top them with an exquisite oil (you must use the best), some Celtic Sea Salt, and some additional spices if you like. Fresh is good, simple is better because then you get to enjoy the unique taste of fresh Earthly foods.

Spices to add:

Cumin, Basil, Rosemary, Parsley, Cayenne, Italian Seasoning, Chili Powder.....to name a few!

Learn how to revolutionize your life with the new “4-Week Dietary Makeover”, an online course that delivers a dynamic approach for a dietary lifestyle like the Centenarians.  I promise this course will awaken and inspire you with a diet delicious enough to last a lifetime.

At age 67, I finally found the right combination of Raw, Cooked, and Cultured Foods. Join me as we journey ahead with strength, vitality and fun.

Click here to learn more.

1 Comment

2 Comments

Broccoli with Simple Toppings

Why broccoli? This delicious sulfur rich vegetable contains abundant mineral elements needed for hundreds of physiological processes to inspire a vibrant body. Here are just a few reasons to put sulfur rich foods in your diet:

1. Sulfur is required for the synthesis of Glutathione, one of our primary endogenous antioxidants. Glutathione, simply put, is your body’s master antioxidant. Existing in every cell of your body, Glutathione is produced within each cell to cleanse and protect your body at the cellular level by detoxifying, removing heavy metals, and fighting free radicals.

2. Sulfur provides strength and resiliency to hair and nails. Sulfur has been known as the "beauty mineral" because it helps the complexion and skin stay clear and youthful.

3. Sulfur is required to synthesize taurine. Taurine is essential for a healthy cardiovascular system, strong muscles, and the central nervous system.

So let’s eat more sulphur rich vegetables and that means BROCCOLI!

There are many ways to make broccoli, cooked and raw. I personally like it better cooked. But, if you are a dedicated raw foodie, or just a lover of raw broccoli, you might find that it is sometimes wonderful to marinate it over night first. Here are a few ideas to start putting this wonderful sulphur rich food into your diet more often with a simple variety.

Raw Marinade

3 cups finely chopped broccoli

1 tbsp olive or Barlean's flaxseed oil

1 lemon or lime juiced

1-2 tsp Nama Shoyu or dash of Celtic sea salt.

Toss the broccoli with the sauce until it is well coated. Cover and let marinate overnight in the refrigerator. The marinade ingredients help to “cold cook” the broccoli, which tames down some of the raw flavor.

The next day, drain out the marinade (can be saved for salad dressings or sauces).

 Add this broccoli to any salad or fine chop for a chopped veggie salad. Add pine nuts, nutritional yeast, more olive oil and of course, salt!

 Cooked Broccoli

 Cut broccoli onto the desired size for serving. Place is a saucepan in a small amount of water and boil/steam or slow cook on a low heat. When it is tender, the way you love it, remove from the pan and place in a serving dish. Top with one of the following toppings.

Topping Options:

 Pumpkin Seed powders are delicious on any steamed or boiled vegetable. Simply grind dry seeds in a coffee grinder to produce a fluffy powder.

Sprinkle one of the seed powders lavishly on the Broccoli. Top with Barlean’s Flax Oil and Tamari or Celtic Sea Salt.

Oils:

Olive Oil is fabulous on broccoli. Add some pine nuts for an instant dish full of crunch and flavor. Just drizzle on top with a yummy salt.

Flax is also fabulous if you use Barlean’s High Lignan Oil. The flax pairs beautifully with Tamari.

Butter and Ghee (from Pasture grazed animals) are always delicious on vegetables and the veggies are said to be healthier when mixed with a good source of saturated fat. Add a squeeze of fresh lemon juice, and you will think you are in a 5 star dining room.

Remember to keep it simple, fresh and organic. It will always be delicious! Learn how to revolutionize your life with the new “4-Week Dietary Makeover”, an online course that delivers a dynamic approach for a dietary lifestyle like the Centenarians.  I promise this course will awaken and inspire you with a diet delicious enough to last a lifetime.

At age 67, I finally found the right combination of Raw, Cooked, and Cultured Foods. Join me as we journey ahead with strength, vitality and fun.

Click here to learn more.

2 Comments

1 Comment

Mixed Vegetables

This dish was actually my breakfast one morning. Most people don’t think of eating veggies for breakfast, but I often have them and enjoy them immensely. A heavy first meal does not work for my tender digestion, so veggies set me up great for the day.
As you can see this tantalizing dish contains a variety of veggies. When you have a variety of small amounts of left over veggies, that is the perfect time to steam them all together. Or, you could be more intentional and buy a few of your favorites, then rustle up different combinations for breakfast, lunch and dinner.
My favorite topping is simple:
Ground sesame seeds, Barlean’s High Lignan flax oil, and Celtic Sea Salt.
If you don’t have sesame seeds or flax oil, drizzle a little olive oil on top, or pasture butter. Trust me, you will love it! Don’t forget your cultured vegetables!
Learn how to revolutionize your life with the new “4-Week Dietary Makeover”, an online course that delivers a dynamic approach for a dietary lifestyle like the Centenarians.  I promise this course will awaken and inspire you with a diet delicious enough to last a lifetime.At age 67, I finally found the right combination of Raw, Cooked, and Cultured Foods. Join me as we journey ahead with strength, vitality and fun. Just launched and on sale now.Click here to learn more.

1 Comment

2 Comments

What Do I Do With String Beans?

I don’t know why, but I can’t seem to get enough string beans lately. Fresh, organic and abundant everywhere on Maui, they call to me. I simply cook them in a sauce pan with about an inch of water.

When they are tender the way I like them (about 10 min at most), I transfer them into a serving dish and add a pat of Raw Organic Pasteur Butter, which according to past and recent food studies, is the most healthy way to deliver the vital nutrients from vegetables to your cells.  Top with delicious Celtic Sea Salt and fresh ground pepper and you will be a happy camper.  Seriously, it does not get better than this!

Here are some variations for toppings:

Barlean’s High Lignan Flax Oil

Ghee

Olive Oil

Organic Pasteur Butter (if you don’t have raw)

Coconut Oil (not my favorite on most vegetables, but luscious on yams, sweet potatoes, and squash)


Learn how to revolutionize your diet life with the new "4-Week Dietary Makeover", a course that will gives you everything you need to know about nutrition and how to make luscious foods easily, affordable and simple.  Click here to learn more.


2 Comments

3 Comments

Beets Recipes: Raw, Cooked and Roasted


Beets: with butter or flax, salt and pepperAhhhh, beets. Another veggie I just can’t get enough of lately. Besides making Beet Kvass, raw beet/apple salad, roasting them, and other variations of cooked beets, beets are just divine when cooked in some water then topped with your favorite oil, butter and salt.

 Here is my favorite simple beet recipes that sings with flavor and luscious richness.

Wash and slice beets into rounds. Put into a saucepan and with enough water to barely cover them. Begin cooking on high heart, and then reduce and steam until tender. You can also slow cook them. The time will depend on the thickness of the cut beets and your desired tenderness.

Purchase hulled sesame seeds. Put about ¼ of a cup into a coffee grinder or blender/vita mix, and blend them into a soft powder. (Be careful not to over grind them as they will turn to a sesame butter, which is Tahini. Make extra powder and refrigerate for next time!

When your beets are tender, drain off the liquid they cooked in and place them into a serving dish. Top beets lavishly with this sesame powder, and then pour a tablespoon or so of Barlean’s Flax Oil. Top with Celtic Sea Salt. That's it! Trust me, the sauce that is naturally created from the rich combo of sesame and flax oil delivers the best of raw and cooked foods together. The sesame seeds and flax oil are raw, which provides value to your body. And, the beets are delicious and easily digestible.

Don't forget the beet greens. If you have them attached to your fresh beets, include them in your cooking. I love, love, love them. Chop the stems from the leaves if you like, then place the leaves on top of the beets when they are about half way cooked. Then enjoy them all together.


Learn how to revolutionize your diet life with the new "4-Week Dietary Makeover", a course that will gives you everything you need to know about nutrition and how to make luscious foods easily, affordable and simple.  Click here to learn more.


3 Comments

Comment

Purple Sweet Potatoes or Yam with coconut Oil & Cilantro

This colorful dish can be all yours within 15 minutes. Simply wash, peel and chop your favorite sweet potato, yam or squash into small pieces. Steam or boil the small pieces until tender. Transfer to serving dish and toss with a tsp. of coconut oil (or, flax oil, Ghee or pasture butter). Then top with fresh cut Cilantro and Celtic Sea Salt. Drizzle a tsp. of honey and squeeze of lemon or lime. Could it be that simple? Yes! Try this delicious dish in the evening when you want an explosion of flavors to revitalize and relax you. It is so rich and fulfilling you will not be tempted for a dessert of any kind.

Ingredients:

Sweet Potato, Yam or Squash

Coconut Oil, Flax Oil, Ghee or Pasture Butter

Honey and Lemon or Lime juice


Comment

Comment

Coconut Chutney - For All Holiday Dinners

Coconut Chutney  (video clip for making Coconut Chutney) Above is the link for a video clip for how to make Coconut Chutney from my new DVD series on Healing Foods. You will love this simple dish that combines raw and cooked foods, healing herbs and coconut oil to make a delicious condiment addition to any holiday meal. Whether you are a raw food vegan or Turkey lover, this digestive dish will go with all. It is simple, oh so tasty and healthy!


Recipe for Coconut Chutney

Ingredients

1/2 jalapeno pepper

1 inch fresh ginger diced

2 cups fresh or dried coconut

1 cup water or enough to make thick slurry

1 tbsp Ghee or coconut oil

1/2 tsp cumin seeds

1/2 tsp black mustard seeds

4 curry leaves

pinch of hing

salt to taste

fresh lime

Instructions

Blend jalapeno, ginger, coconut meat and water in a blender or Vita Mix. Let sit while you cook the following:

In a hot skillet add the Ghee or coconut oil. When the Ghee or coconut oil is hot in the skillet, add the herbs, curry leaves, hing and salt. Cook them long enough to let them sizzle and pop. Do not let the oils burn. When the ingredients have infused sufficiently remove from the heat and add the entire mixture to the coconut slurry in the Vita Mix. Blend until creamy but still lumpy. Top with fresh lime juice.

Serve on anything and everything for an exciting taste explosion!


Comment

1 Comment

Swiss Chard ala Sesame Seeds and Flax Oil (Barleans of Course)

This is one of the recipes using healthy oils that started my cooking career. No kidding. I would make this dish and people would swoon. I took it to potlucks, and people would come up to me and say, "What is that dish, it is delicious." Upon hearing my answer, their eyes would get big and they would respond with, "Wow, I never liked Swiss Chard." This is wonderful, how did you make it?" And so it began, my relentless task of repeating the recipe over and over again. My sister finally asked, "Would you please write a little cookbook for me." And, so it began.

Here is how you make this luscious dish:

Ingredients

1 Bunch of Swiss Chard

1/4 to 1/2 cup Hulled Sesame Seeds

Barlean's High Lignan Flax Oil (order through the Recommended Products page for a 20% discount)

Tamari and/or Celtic Sea Salt

Instructions:

Wash and break Chard leaves into smaller pieces. You can use your hands or pile the leaves on top on each other and cut through them with a knife making strips about 1 inch wide. Place in sauce pan, cover with water and boil for a minimum of 4 minutes to remove the Oxalic Acid (longer if you want the leaves to be more tender).

While the Chard is cooking, ground the sesame seeds in a coffee grinder or your Vita Mix, making a soft powder consistency. *Make extra is you like and store in a glass container in the fridge to use for a few days - not much longer as the oils in the sesame seeds will go rancid.

When the Chard is cooked, drain the water off and discard. Place Swiss Chard in a dish. Sprinkle the sesame seed powder lavishly on top. Pour at least 1 tbsp (per person) of Barlean's High Lignan Flax Oil on top. Put more flax oil as desired, or if making a large dish. You could use olive oil in this recipe, but the flavors will change dramatically. Barleans' High Lignan Flax Oil is what makes this combo sing.

Sprinkle Tamari or Celtic Sea Salt on to taste. Be careful with the Tarmari as it is strong and can take over. I personally like it with salt best, buy many of my clients love the Tarmai.

Smush the mixture slightly from the top with a spoon or fork as you see a yummy sauce melt together.  No need to stir it. It is best to keep the sauce on top.

Don't stop here. You can make this same topping for many of your veggie dishes. It is oh so easy, and makes a delicious, rich and healthy sauce instantly. This recipe is a good example of mixing raw and cooked together. The oil and seeds are raw, and the Swiss Chard is cooked, which is a great way to Make Every Bite Count.

Chef Teton

1 Comment