3 Comments

Gluten Free Chocolate Chip Cookies with Coconut Oil

Singing Dog Vanilla knows how to stand out in a crowd of chocolate!!! This Vanilla tastes like vanilla smells but better. It is so rich and vanillaeee. I recently met one of the owners of the company and asked if I could try the Vanilla in some of my favorite recipes. First, I tried my "famous" chocolate chip cookies" made with Coconut Oil instead of butter. Wow, I guess I never tasted Vanilla before! Once again I was reminded how much difference it makes when you choose high quality food products. If you like to bake or make any raw food recipes that call for Vanilla, then you need to use Singing Dog.

You will thank me, that is for sure! But the gratitude goes to Singing Dog for going the extra mile to bring us real Vanilla affordable and available where we shop.

The same holds true for coconut oil. Barlean's coconut oil is by far the best, with a second runner up going to Artisana. The aroma, like in the Vanilla, smells like a fresh picked coconut. The flavor gives off the same dynamic. My neighbors are always asking for my Coconut Chocolate Chip Cookies. Put them in the freezer and then defrost (if you can wait) for about 10 minutes. You may not be able to stop!!!

If you can't find Barlean's coconut oil in your local store you can purchase it off my Chef Teton'website for 20% off. Then order their High Lignan Flax oil for the best sauces and dressing ever!

Enjoy!

Recipe:

1 1/4 cup Almond Meal

1 cup rice flower or an all purpose gluten free flour

1 tsp Baking Powder

1 1/4 cup Organic Light Brown Sugar

2 Eggs

1 tsp Singing Dog Vanilla

1 cup Barlean's Organic Coconut Oil (just under 1 cup seems to be perfect)

1 Cup Dark Chocolate Chips and 1 cup chopped Walnuts (add a handful of dried coconut flakes too)

Mix all ingredients and bake at 375 for about 15 min. You will note that the batter seems very oily from the Coconut Oil. Do not worry, it is oily at first, but they bake up beautifully. Remember that Coconut oil, when refrigerated (or cold) is much harder than butter, and reversely, it is much more oily when soft. If yours if hard from the cold, heat on very low heat to melt. Add the sugar to let them blend together. DO NOT over heat as sugar will harden. After the cookies are baked, their temperature determines their consistency!  Enjoy all ways.

3 Comments

4 Comments

Tips for Eating Carrots - Use a Grater!

The Foodie News


Greeting from Chef Teton,

I am sending you a picture of the almighty carrot after it's experience through my favorite element on the grater. Those of you who have my DVD series know that I love grating the carrot on this fine part of the grater. The picture illustrates the exact part of the grater that turns the carrot into a sweet food that is delicious on sandwiches, salads, or just as a side dish.

The Juicy CarrotNow this may seem sort of silly to you - or just to simple, so let me tell you why I offer up this suggestion. It was told to me by a well-known source that "a carrot a day" is almost as important as the "apple a day". And, this is a simple way to add a carrot to every meal.If you are the kind of person that gets a carrot, washes it and begins the eating journey like you're eating an apple - then great! But, I find most people either want to cut it up into strips and/or cut it into chunks on a salad. Although this type of chewing is fabulous for strengthening the teeth and jaw, not as much carrot will be consumed.

When grated like the picture, the juices are released and the carrot is transformed into a sweet and juicy food ready for all kinds of culinary adventures. Piled high on a sandwich, it will provide moisture and a sweet flavor. In a salad, it sort of clumps up with the dressing when tossed and adds this wonderful juicy dimension. Serve it on a plate as a side dish with a little Bragg Liquid Aminos, or Styrian Pumpkin Seed Oil and you will rejoice in the simplicity and taste. I have found that many children will eat up a whole pile of it because it is easy to chew, and so juicy and sweet. I often make a bed of grated carrot on a plate to serve as my foundation for a raw salad. I add other vegetables, and then a rich dressing for an extremely high antioxidant meal.

The technique is simple too - all you need is a good grater. They are easy to clean too - just a good swish of warm water and then let them drain to dry.

Now, for some inspiration as to why you may want to put the mighty carrot in your life on a daily basis.

Carrots are best known for helping with our eyes. Beta-carotene, lutein, and zeaxanthin all concentrate in the retina of the eye, and carrots are full of them, not to mention several other nutritional marvels that have huge names. The carotenes alone possess life extension properties that protect us from the toxic effects of free radicals. And, in today's world we are assaulted with elements that cause free radical damage almost everywhere we turn. A carrot, one of the richest sources of Beta-carotene, is known to be a great defense against cancer. And, there is more.

Carrots are known to help dissolve accumulations such as stones and tumors; improve liver function and stimulate the elimination of wastes; strengthens the spleen and pancreas; contains an essential oil that destroys pinworms and roundworms; are alkaline-forming; useful for skin lesions and lungs; digestive track and urinary tract infections; they strengthen the connective tissues and aid calcium metabolism; their silicaceous fiber and ability to liquefy the bile make them useful in treating constipation; and, eating grated carrots are best for parasites and dysentery.

And, the best part is - they are delicious! Now, you have a new tool to put more carrots into your daily regime. If you work out of the office, get a grater for the office kitchen. Then you can add a grated carrot to a salad or sandwich you purchased at the deli.

Wow, I think I am going get the grater out and enjoy a salad. Here is one of my favorite recipes:

Start the plate with:

Grated pile of 1 carrot

1 stalk of celery - chopped small including the greens on top

1 tomato - cut in bite size chunks

Other chopped veggies of choice

Sea Kelp

Top with your favorite dressing (mine is the Golden Elixir of course) - or just some EV Olive Oil, lemon or apple cider vinegar.

Remember; it is all about Simple!

Mahalo

Chef Teton

4 Comments

Comment

Cultured Fermented Vegetables - Class

Chef Teton will be giving a brief presentation on the Power of "live" Cultured Veggies tonight at the Farmer's Union Meeting in Pukalani at 6:00PM. Learn to make your own. Two classes coming up; one on Thursday in Huelo and another in Wailuku next Wednesday, the 25th. To learn more visit Chef Teton's Blog on Events page. Watch a 1 min Video on Cultured Veggies and Instructional DVD. Read about these digestive miracles on Chef Teton's Blog.

Live Cultured Veggies

Comment

8 Comments

Award Winning Cultured/Fermented Vegetable Recipe

Yes, that's right. This recipe won the award for best tasting cultured (fermented) veggies at the AgFest 2011 here on Maui. I like to call them Cultured Superfoods! Recipe:

10 cups cabbage - 3 small heads chopped or grated(save outer leaves for canopy)

5 cups red cabbage - 1 head chopped or grated (save outer leaves for canopy)

6 jalapenos - cut open and clean out seeds, then chop fine

2 onions - chopped fine

3 carrots - finely grated

1 bunch kale - finely chopped

2 tbsp sea vegetables - blended to make a powder (or use dulce or kelp)

1/4 cup sugar or local honey

1/4 to 1/3 cup sea salt for veggies

1/8 cup sea salt for salty brine to top

1/2 to 3/4 cup sprint or filtered water for brine

Use a Cuizinart or food processor to chop/grate all ingredients, except sugar, honey and salt.

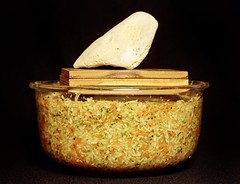
Mix all ingredients together (except salt water mixture for brine) in a glass bowl or pickling crock. Cover with large leaves of cabbage to create a canopy cover to protect the foods being pickled.

Place a plate on the top of the canopy - one large enough to cover as much as the surface of the canopy as possible. Place rock on top of the plate to create some pressure on top of the vegetable mix and canopy. Do not use a rock so heavy that it pushes too much of the liquid juice of the vegetables over the top of the plate. Use a rock that gives medium pressure to the mixture and that forces some liquid juice from the vegetables over the top after a bit of time.

A good way to tell if the pressure is enough is to check on the mixture 8 to 12 hours later to determine how much liquid is being forced up above the plate. Some liquid should come up, but not too much. When this is determined it is a good time to mix the salty brine (last two ingredients above) and pour over the top of the plate. This salty brine will insure that no bacteria or mold will get into the mixture. It is your protection.

Cover bowl of veggies, plate, rocks and all with a clean cloth and place in a dark closet or corner of the room and let sit for a minimum of four days. Seven days is best, and it is fine to let it sit for 10 to 14 days. The vegetables will soften over time, create more probiotic bacteria (friendly flora) and enhance flavors.

You can also use a crock made for fermenting vegetables. The porcelain crocks come with stones for weight and air tight lids. Vegetable starters can also be used to stimulate fermentation process and enhance friendly flora.

Remember, all cultures where people live to be a healthy 100 years old have a naturally fermenting food in their daily diet. Using our precious organic veggies is a great way to make Cultured Superfoods, taking the idea of KimChee and Sauerkraut a lot further. What a great new way to get a variety of superfoods into your daily diet. They will aide in digestion and are the perfect compliment to every meal. You can make them spicy or flavor with many herbs.

Harvest by removing the canopy and discarding it. Keep all the valuable juice. Place fermented veggies in glass jars and refrigerate. They will last for months in the fridge!

Note: Vegetable mixture will certainly take on an interesting aroma. They may foam up a bit and even attract a little mold on the side of the bowl over time. Do not worry unless mold gets into the mixture. Smelly and foamy is a good sign. Experiment and feel free to give me a call or email me with your questions: Enjoy!


8 Comments

1 Comment

Green Smoothie Recipes

Green Smoothie Recipes  - Delicious and Refreshing!

I received the following question from Sharon in Dana Point. She wrote, 

"I love your Raw Food DVD's. I have many and your are my favorite. The a la Oils is also great with many great ideas. I have a questions about vegetable soups/drinks. I love the raw food soup with avocado, but would love more greens. The powdered green drinks are aweful. I really cannot drink them. They make me feel bloated and full. "

Every few days I make enough Green Smoothie to last me till the next batch. This way I do not have to make one each day, saving me time. Also, if I have it on hand then I am more likely to drink it daily. Surprisingly, it stays fresh and tasty for at least 3 days. The smoothie is usually pretty thick, so I just ad some water when I pour a glass. Store in a glass bottle and drink at least 4-6 ounces twice daily.

Veggie, Lemon, Apple

8 – 12 oz Water 2 stalks celery 1 - 2 sm carrots 1 whole lemon (peeled and seeded) 1 apple Handful’s of: Parsley Cilantro Kale

Blend all the veggies till smooth consistency.

Veggie, Tomato, Ginger

8 – 12 oz Water 2 stalks celery 1 - 2 sm carrots 1 whole lemon (peeled) ½ red bell pepper 1 tomato 1 lemon (peeled and seeded) Handfuls: parsley, cilantro and kale

Optional Ginger Garlic Avocado Jalapeño

Use any other veggies you may have on hand. I often include squash (summer and zucchini), broccoli, sunflower sprouts, and any other sprouts. Be creative. Apples will sweeten if needed and they combine well with all veggies.

1 Comment