Viewing entries in
Raw Food Diet

Comment

Alkaline Recipe's - Frothy Green Smoothies

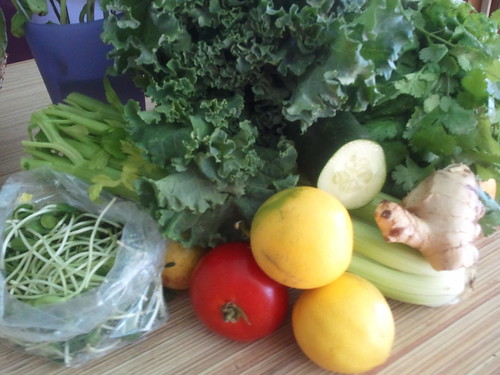
Frothy Green Drinks – Keep Alkaline Another great tip for the holidays is to keep yourself alkaline as much as possible. A wonderful way to do this is to drink a green smoothie (without fruit) every day. In fact you may want to start your day with one. This way you will set your system to tolerate those choices you might feel guilty about later on!


My favorite recipe:

Celery

Parsley

Cilantro

Cucumber

Lemon

Ginger

Comment

1 Comment

Raw Almond Seed Cheese on BuckWheat Crackers

What an amazing afternoon, before dinner or anytime snack or meal. Yum.

What is that beautiful white creamy stuff on top of the avocado? It is Almond Seed Cheese. The avocado and seed cheese are piled high on top of a Raw BuckWheat Pizza Dough Cracker.

The recipe and instructions are below. It may seem like a lot of work is involved. But, it you do it in stages, it is effortless, as each step is easy. The secret to raw food is getting in a flow and planning ahead. Some people keep a tight schedule, never running out of their yummy raw snacks.  I go by feel, and when I am out of my favorites I get inspired.

I call the crackers "Pizza Dough Crackers" because they are more moist than typical raw food crackers. Their moistness is due to the use of olive oil in the recipe. You can't dry out olive oil so the dough cracker has more of a bread consistency.  They have a robust flavor, and a texture that is more chewy than traditional raw food crackers. What is really great is that these dough crackers substitute the need for traditional breads. In keeping with the theme of mixing raw and cooked, they are also great with egg salad, tuna, raw goat cheese, avocado, tomato, onions, and cultured veggies. Read below for the recipes and custom make them as you like.

Schedule for making BuckWheat Pizza Dough Crackers:

1. Soak buckwheat and sunflower seeds, over night (or in the morning if you want to make the crackers later in the afternoon, because neither buckwheat or sunflower seeds take long to soak - minimum of about 2 hours).

2. The next day, or later the same day, blend the ingredients for the dough crackers and place in the dehydrator for drying (about 18 hours - turning once). If you use an oven then set it to the lowest temperature. Note, they may dry faster in an oven.

3. When finished,  store them in an airtight container and you will have them for weeks. Refrigeration keeps them fresher longer.

* A scheduling note: If you soak the seeds and then run out of time and can't make the recipe, you can store the seeds and/or nuts until ready to prepare them. Simply rinse the seeds/nuts well and store them in filtered water in the fridge until ready to use. If you go more than one day without using them, just change the water and they will be good for another day. I like to use them within a couple days. Most importantly, change the water each day.

Scheduling for Almond Seed Cheese:

1. Soak almonds for at least 8 hours. Sometimes, I change the water and let them soak again for several more hours. Overnight is always good. If you are not ready to make the cheese the next morning, just change the water and let them soak until you are ready. If you run out of time again, then store them in the fridge in fresh filtered water.

2. After the almonds are soaked it is nice to blanch them and remove the skins. This is not absolutely necessary, but blanched almonds will produce a beautiful white cheese. You can store them with or without the skins. Since the removing of skins can be tedious and time consuming, you might like to schedule it around a good TV program, movie and/or make it a mindful meditation.

Again, plan ahead. The cracker will last for weeks if kept in an air tight container.  The seed cheese needs to be eaten within about 4-5 days.

Recipe: BuckWheat Pizza Dough Crakcers

1 cup saoked buckwheat groats 1 cup soaked sunflower seeds 1/2 cup soaked ground flax seeds 2 carrots 1/3 cup olive oil 1 tbsp Italian seasonings (or fresh herbs to taste)

Salt to taste and add garlic, cayenne and any other spices you might like.

Directions: Mix all ingredients together in a food processor. Start with the carrots, then groats and seeds, remaining ingredients. Coat a dehydrator sheet or a cookie sheet with a small amount of olive oil and scoop batches of dough out to make rounds. You can make a large pizza dough (about 6 inches in diameter) – or you can make smaller individual rounds (about 3 inches in diameter), which is my preference. The smaller rounds are easier to serve and eat.

Press out the dough evenly to about 1/4 to 1/2 inch thick, by patting the top with your finger tips. If it gets too sticky and hard to work with, dip your fingers into some orange or other citrus juice. Once crust is pressed out evenly, dehydrate at 100-115 overnight or about 7 hours or until crust is dry enough to turn over and transfer to the mesh rack. Use a spatula when lifting dough and be very careful when turning and transferring it. Dehydrate for another  8 hours or until completely dry. If crust is dry, and stored in a cool dry air tight container, it can be kept fresh for up to a month.

Note: I like to use olive oil because it gives the dough crackers a moistness which is more like bread. Use more oil for more moistness. If you do use a lot of oil, you will need to refrigerate to store.

Recipe: Almond Seed Cheese

2 cups almonds - soaked

2-3 cups filtered water

Salt to taste, spices of choice

Directions: Rinse almonds well. Blanch to remove skins by putting nuts into boiling water for about 1 minute. Remove from heat and strain. Using your fingers, squeeze the nuts and the skin should roll right off.

Blend the almonds in enough water so that they blend easily. Blend until creamy, which usually warms them a little as well. Pour mixture into a cheese cloth bag to ferment. Squeeze out excess moisture over a bowl so that the precious milk does not go to waste (I always drink it right then). Don't squeeze the bag dry or you will get a dryer cheese. Hang the bag with a bowl to catch the drippings underneath it. The seed cheese will then take another 12 to 24 hours to ferment. Preferably, the cheese should ferment in the dark. Since I do not have a dark closet to hang the bag in, I hang mine on a cupboard door knob with a bowl under it, then cover it with a paper bag to keep the light out. I usually ferment overnight alleviating the need to cover it with a bag.

Enjoy!!!

Would you like visual instruction on how to make Raw Pizza Dough Crackers and Seed Cheeses? You can on my Raw Food DVD series. See a sample here: Raw Food DVD Series. And, if you want to experience Essential Cuisine, the wonderful healthy world of "Raw, Cooked & Cultured Foods", take my 4-Week Dietary Makeover online course. The course includes my DVD collections, plus audio programs, recipes, shopping lists and so much more!


1 Comment

1 Comment

Sesame Seeds, Sacred Clay & Kefir

Good morning Susan,

I purchased your online series as a supplement to the DVDs which I already have and I have some comments, suggestions, questions. I have progressed a lot with my diet since I bought your DVD's which I watched but wasn't ready to embrace at the time so I am going through your online course with joy and appreciation.

My internet connection is painfully slow so its hard to watch the videos online. Please can you let me know if they are identical to the DVD's or if there is any added material and if so what. I hadn't thought to grind the sesame seeds that is a great idea - how long can I store them for before the oils go off or they oxidize? Can you get raw milk on Maui? I have heard that it is very expensive. I bloat if I make Kefir with milk and what you said about the enzymes in raw milk to help digestion makes sense. I would like to try that. I manage by combining milk with cream to make kefir but it really makes me put on weight. Maybe I don't digest fat too well. A great tip I got from Jack La Lanne is to rinse a thermos flask out so that it is wet inside and put it in the freezer overnight. Use it the next day to put your vegie juice in and it will keep fresh much longer. Some recipes call for juicing herbs but they just slip through the juicer when I do it so I have given up. do you have any suggestions.? I am working on supplementing my diet with herb teas for calcium, iron etc and using a dandelion chai instead of coffee which I like a little too much. Playing with teas is fun and a good way to keep hydrated when water isn't appealing. I am also experimenting with tips that I get passed onto me from David Wolfe who is such an innovator. One of them is using clay in various forms to absorb the toxins in our system because it attracts the positively charged irons in toxins. If you are interested I can forward you the emails with the information.

You are an inspiration, I wish I could come to your Saturday workshop but I am working. Thank you so much. I love your lightness and joy. Aloha, Rosy.

1 Comment

2 Comments

Coconut Cilantro Ginger Sauce

I really don't have to say much more than "Coconut Cilantro & Ginger". This sauce is simple and so delicious that you will be spooning it from the fridge when ever you think of it. It is fabulous on Kitcheree, wonderful on veggies or grains, and has the perfect flavors to wake up a white fish. All you have to do is blend the following ingredients together: 1/4 to 1/2 cup water

1/2 cup shredded coconut

1/2 to 3/4 cup fresh cilantro

1 tsp of freshly chopped ginger (or squeeze the ginger juice from finely grated ginger)

salt to taste

Blend all ingredients together. I like to keep it somewhat coarse, yet blended well. Store in a glass jar and enjoy on a variety of veggies. If you want to use it for a white fish or veggies, then drop a tsp or two in the saute pan with a little coconut oil. Add a dab of water. Cover and let simmer.

The flavors are to live for!

2 Comments

3 Comments

Kale Chips - Dehydrating Vegetables

Kale is not my favorite vegetable. Not sure why, just don't care for it. So, when I heard people talking about Kale Chips, and saw packages of them in the stores, I didn't even them. They did not appeal to me one single bit. Then one day a friend gave me a bunch of kale and since I did not know what else to do with it, I decided to give Kale Chips a try. I think it was the nutritional yeast and salt that sounded good. Anyway, I fell in love with my Kale Chips. Now I take them to potlucks, in the car on the go, or munch away at my desk.

Now I like Kale! I tried doing the same with carrots, beets and other veggies. Good!


Wash and dry a bunch of kale. Tear leaves up into small pieces, removing the stem.

Toss in about 1 tbsp of olive oil, 1/4 to 1/3 cup nutritional yeast, and a tsp of salt.

Place on teflex tray and dehydrate for about 4 hours. You can also place them on a cookie sheet and bake them in the oven at a very low temperature for a couple hours. Toss now and then if needed.

It is amazing how they shrink and change color. Makes you wonder if this is what happens to our cells when we don't keep ourselves hydrated.

3 Comments

4 Comments

Raw Oatmeal Date Apple Cookies

These cookies are so good, great for a "pac & go". They are hearty and fill you up. They are sweetened with dates, raisins and apples.

Ingredients

2 cups oat groats

¾ cup dates

½ cup dried raisins

½ cup walnuts

2 or 3 apples, grated

½ tsp salt

Optional: Cinnamon

No need for any soaking of groats, dates or raisins. It is good if you can soak the walnuts for a few hours, but not absolutely necessary. Drain and rinse after soaking.

Prep:

1. Grind dry groats in a blender into fine powder. A food processor may work as well.

2. Chop raisins and dates (remove pits from dates)

3. Grate apple on course part of grater (careful not to grate too fine like applesauce).

4. Rough or medium chop walnuts as desired.

Transfer groats to a bowl and add the raisins, dates, walnuts and apples. Mix well. The dry groat powder will be soaked up by the apples.  Add cinnamon if desired.


Press into cookie rounds on a teflex dehydrator tray and dehydrate for about 10 hours and then remove teflex tray and turn for a couple more hours of dehydrating. Dehydrate until the cookies reach your desired texture.


Use the juice of an orange or lemon to dip your fingers into when pressing the dough into rounds. This works well to help keep your fingers from sticking to all the dough.


Cookies can also be baked at a very low temperature in the oven on a cookie sheet. You may want to turn them half way through.

These cookies are the bomb and work well for a travel snack. Enjoy!


4 Comments

4 Comments

Easy Raw Cacao Truffle Recipe

By popular demand! Here is the recipe for these simple and yummy Raw Cacao Truffles (you can use any unsweetened cacao powder as well). They are luscious and creamy and make for a great afternoon pick up. Need I say more? Blend all the ingredients below together. No need to cook. When refrigerated/stored they last for a long time. They also firm up in the fridge and best when served at room temperature.

Recipe below is a basic recipe that seems to always vary. Mix ingredients to taste and explore other flavors with spices, nuts and seeds.

Main Ingredients:

1/2 cup Coconut Cream (sundried coconut meat ground into a butter-Artisana makes one as does Wilderness Family Naturals - online).

3/4 cup water (warmed)

1 to 2 tsp vanilla

1/2 cup maple syrup

3 tbsp coconut oil

2 tbsp raw sugar or honey (more to taste)

1/2 tsp salt (more or less to taste)

Optional: 1/2 cup cacao nibs - 1/2 cup shredded coconut - or any other nuts or seeds you would like to add. Seen in the picture above, Golden Yukon Berries (sour type raisins) are added. Cashews are great to garnish with as well.

You can also use cinnamon, cayenne, chili powder and other seasoning to make your own truffles.

Directions:

Begin by blending the coconut cream and coconut oil in warm water. Once blended, add maple syrup, sugar and salt or seasonings. When creamy, add cacao powder through a sifter to alleviate lumps. Blend in a little at a time. Mixture will thicken to a point where it is difficult to stir. If too dry, add a bit of water. Remember they will firm up when refrigerated. They will also thicken a bit when the cacao nibs, coconut and/or other nuts are added.

Roll into balls and place nuts or Golden Yukon Berry on top with slight pressure. Chill. Best to serve at room temperature.

These travel well, but remember to package in a container where they can soften and still hold their shape.

Yum!

4 Comments

3 Comments

Green Smoothie - Dietary Makeover Step Two

What a way to start a day. Step two of the Dietary Makeover is to bring green smoothies into your daily life. This Vita Mix container is full of sunflower sprouts, red pepper, parsley, celery and a whole apple and lemon. Kelp and dulce flakes were added for extra minerals. Drink a glass and store the rest in a glass jar for a great afternoon snack.

3 Comments

3 Comments

Easy Raw "Almond Lemon Apple" Salad Recipe

Cool, refreshing, light and fulfilling all at once. Oops, I forgot to say "luscious". You can make this fantastic salad for just one or a whole group. I love to make it for a mid morning or afternoon snack. This last week at the Remembering Pan Retreat we made a bunch of it, receiving raves from everyone. The way we got it into this cool mold was to place the entire mixture into a strainer/colander. With a couple shakes the weight of the salad molded the mixture into the shape of the strainer/colander. Then we turned it upside down on to a plate. There was juice left at the bottom of the bowl, which we just poured on top of the salad mold. We topped with coconut flakes and served it proudly. Here is the basic recipe serving 1 or 2

1 apple

2 tbsp raw almond butter

1 lemon juiced

Grate apple. Set aside. Mix almond butter with lemon juice to make a thick gravy. Add to the apple mixture. That is all you need to do. Stir and enjoy.

Add raisins, coconut flakes, chopped nuts, or any other dried or fresh fruit. The almond butter/lemon juice gravy is what makes the fabulous sweet/sour flavor.  Enjoy.

Now if you want to get more decadent, add raisins, chopped almonds and some coconut flakes.


3 Comments

2 Comments

Raw Buckwheat Porridge with Coconut Cream

Raw Buckwheat Porridge with Coconut Cream is one of the best breakfasts or afternoon snacks ever! It will satisfy a sweet tooth, fill you up and nourish you beyond your senses....all at the same time! Soak 1/2 cup buckwheat for at least 1 hour. Then rinse well and set aside. In a bowl put in 1 to 2 tablespoons coconut cream (or butter) concentrate (Artisana makes a good one) and mix with water for desired consistency and sweetness. Stir in buckwheat and top with walnuts, fresh apples and mint. This cereal or porridge is great with bananas and other fresh fruits and nuts. Enjoy while you Make Every Bite Count!

2 Comments

8 Comments

Raw Cacao Pie with Coconut Creme Wins 1st Place!

This Raw Cacao Pie with Coconut Creme won First Place in the Maui Farmer's Union dessert contest.  What a great time we all had last evening at our ThanksGiving dinner. There were 10 other dessert entries all promoting local organic foods grown on Maui, and a fabulous pot luck. Here is what I made. First, I took locally grown Macadamia nuts and ground them with some soaked dates (and date water) to make the pie crust. Add walnuts, pecan's or cashews if you like.  Press the gooey mixture into a glass pie dish. While I was making the cacao filling and chopping coconuts down off the tree, I put the crust in the dehydrator to get crispy. Later, just before loading the crust up with the Cacao Mousse, you will need to cool it by putting it into the freezer for a few minutes, or just let it cool by sitting out for a bit.

Next, I made the Cacao Mousse. See Raw Cacao Mousse recipe. Refrigerate the Cacao Mousse while making the rest of the pie so it can firm up a bit. This is what the avocado and cacao powder look like after being blended in the Cuizinart. How creamy and delicious does that look? You should taste it!

OK, I realize you don't all have coconuts right out in your yard as I do, but you can usually find dried coconut, which you can blend with some honey or sugar water (to sweeten), and add some Agar Agar if needed for thickening. I used mature coconut meat for the following recipe:

Coconut Filling

2 cups          Raw Fresh Coconut Meat

¼ cup          Maui Sugar

1 tbsp          Maui Honey (sweeten to taste)

Blend until creamy.

Layer pie pan with crust with Cocoa Mousse, then Coconut Crème, then top with fresh sliced Kula Strawberries. Raspberries are divine with this recipe, but we don't have local raspberries on Maui!

Enjoy!!

8 Comments

Comment

How To Highly Mineralize Every Meal With Sea Veggies: Mineral Mixture!

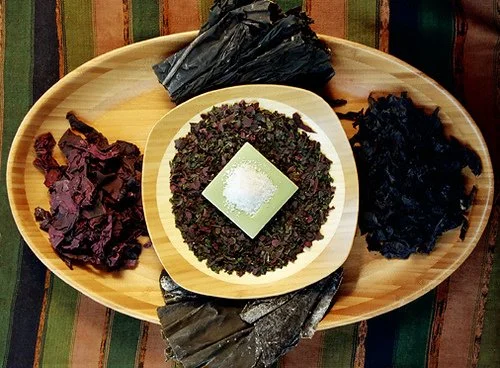
Mineral Mixture - Sea Veggies!

Many people are striving to put valuable sea veggies in their body right now, particularly because of our need for more minerals. My favorite way is to make the Mineral Mixture out of several different varieties of sea veggies. It is so simple and the mixture will enliven all your foods and recipes with an enhanced flavor and vital minerals. A small amount can also serve as a thickener to sauces and dressings. Yum!

Sea Veggies are also easy to store. They require no refrigeration and will last for a long time.

Here is the simple recipe and method:

Sea Veggie Mineral Mixture

Purchase a variety of sea veggies, like the following:

  • Dulce

  • Alaria

  • Kelp

  • Nori

  • Laver

  • Kombu

Take a few pieces, or a handful of each of the sea vegetables you have on hand. Grind them in a high-powered blender. I prefer the Vita Mix. Keep mixing and grinding on high speed until you get a nice powdery substance that you can use to sprinkle on everything! Note: some sea veggies can be slightly damp, particularly Dulce. If yours is, put them in a dehydrator first for several minutes until they dry out. If you do not have a dehydrator then use your oven on low for about 10 to 15 minutes. The purpose is to dry them out so they will become blend easily.

Store in a glass jar in your pantry. I like to keep a small dish out of my counter. I sprinkle in on everything as a condiment. It is great to top on eggs, soups, salads, veggies, potatoes, squash, sauces and dressings. You can also add some to your drinking water, particularly when exercising or working out.

Watch how I make the Mineral Mixture on the Raw Food Series and in the entire Essential Cuisine series: Raw, Cooked and Cultured Foods.

Enjoy!

Chef Teton

Comment

Comment

Barlean's Lemon Swirl - Veggie Sauce

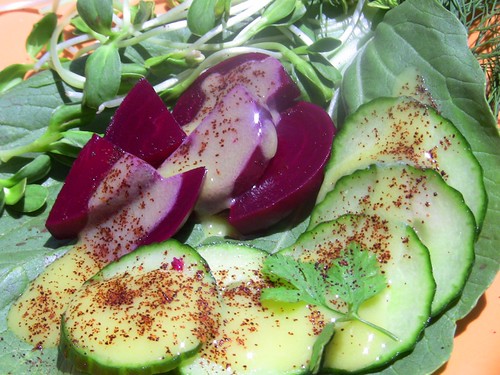
Beet Cucumber Swirl Barlean's asked me to make up some recipes for their new award winning Swirls. Swirls are fish oil and flax oil supplements appropriately named as they are made into flavorful mixtures with sweet flavors. One is a Lemon, which looks like lemon whipped cream and tastes even better. My first approach would be to make a sweet sauce to put on fresh fruit, but my roommate found the jar in my fridge and put it on her vegetables. She just loved it.....yet did not know what she was eating.

My next step was to enhance this sweet lemon flavor into a cool and refreshing sauce for veggies.

So here you have my first invention........Lemon Swirl with EVOO and some Raw Tahini......Add a little sea salt and it is the perfect simple sauce full of various flavors. Note the sea vegetable mineral mixture on the top; a dry mixture of various kinds of sea vegetables.

Comment

4 Comments

Tips for Eating Carrots - Use a Grater!

The Foodie News


Greeting from Chef Teton,

I am sending you a picture of the almighty carrot after it's experience through my favorite element on the grater. Those of you who have my DVD series know that I love grating the carrot on this fine part of the grater. The picture illustrates the exact part of the grater that turns the carrot into a sweet food that is delicious on sandwiches, salads, or just as a side dish.

The Juicy CarrotNow this may seem sort of silly to you - or just to simple, so let me tell you why I offer up this suggestion. It was told to me by a well-known source that "a carrot a day" is almost as important as the "apple a day". And, this is a simple way to add a carrot to every meal.If you are the kind of person that gets a carrot, washes it and begins the eating journey like you're eating an apple - then great! But, I find most people either want to cut it up into strips and/or cut it into chunks on a salad. Although this type of chewing is fabulous for strengthening the teeth and jaw, not as much carrot will be consumed.

When grated like the picture, the juices are released and the carrot is transformed into a sweet and juicy food ready for all kinds of culinary adventures. Piled high on a sandwich, it will provide moisture and a sweet flavor. In a salad, it sort of clumps up with the dressing when tossed and adds this wonderful juicy dimension. Serve it on a plate as a side dish with a little Bragg Liquid Aminos, or Styrian Pumpkin Seed Oil and you will rejoice in the simplicity and taste. I have found that many children will eat up a whole pile of it because it is easy to chew, and so juicy and sweet. I often make a bed of grated carrot on a plate to serve as my foundation for a raw salad. I add other vegetables, and then a rich dressing for an extremely high antioxidant meal.

The technique is simple too - all you need is a good grater. They are easy to clean too - just a good swish of warm water and then let them drain to dry.

Now, for some inspiration as to why you may want to put the mighty carrot in your life on a daily basis.

Carrots are best known for helping with our eyes. Beta-carotene, lutein, and zeaxanthin all concentrate in the retina of the eye, and carrots are full of them, not to mention several other nutritional marvels that have huge names. The carotenes alone possess life extension properties that protect us from the toxic effects of free radicals. And, in today's world we are assaulted with elements that cause free radical damage almost everywhere we turn. A carrot, one of the richest sources of Beta-carotene, is known to be a great defense against cancer. And, there is more.

Carrots are known to help dissolve accumulations such as stones and tumors; improve liver function and stimulate the elimination of wastes; strengthens the spleen and pancreas; contains an essential oil that destroys pinworms and roundworms; are alkaline-forming; useful for skin lesions and lungs; digestive track and urinary tract infections; they strengthen the connective tissues and aid calcium metabolism; their silicaceous fiber and ability to liquefy the bile make them useful in treating constipation; and, eating grated carrots are best for parasites and dysentery.

And, the best part is - they are delicious! Now, you have a new tool to put more carrots into your daily regime. If you work out of the office, get a grater for the office kitchen. Then you can add a grated carrot to a salad or sandwich you purchased at the deli.

Wow, I think I am going get the grater out and enjoy a salad. Here is one of my favorite recipes:

Start the plate with:

Grated pile of 1 carrot

1 stalk of celery - chopped small including the greens on top

1 tomato - cut in bite size chunks

Other chopped veggies of choice

Sea Kelp

Top with your favorite dressing (mine is the Golden Elixir of course) - or just some EV Olive Oil, lemon or apple cider vinegar.

Remember; it is all about Simple!

Mahalo

Chef Teton

4 Comments

1 Comment

Green Smoothie Recipes

Green Smoothie Recipes  - Delicious and Refreshing!

I received the following question from Sharon in Dana Point. She wrote, 

"I love your Raw Food DVD's. I have many and your are my favorite. The a la Oils is also great with many great ideas. I have a questions about vegetable soups/drinks. I love the raw food soup with avocado, but would love more greens. The powdered green drinks are aweful. I really cannot drink them. They make me feel bloated and full. "

Every few days I make enough Green Smoothie to last me till the next batch. This way I do not have to make one each day, saving me time. Also, if I have it on hand then I am more likely to drink it daily. Surprisingly, it stays fresh and tasty for at least 3 days. The smoothie is usually pretty thick, so I just ad some water when I pour a glass. Store in a glass bottle and drink at least 4-6 ounces twice daily.

Veggie, Lemon, Apple

8 – 12 oz Water 2 stalks celery 1 - 2 sm carrots 1 whole lemon (peeled and seeded) 1 apple Handful’s of: Parsley Cilantro Kale

Blend all the veggies till smooth consistency.

Veggie, Tomato, Ginger

8 – 12 oz Water 2 stalks celery 1 - 2 sm carrots 1 whole lemon (peeled) ½ red bell pepper 1 tomato 1 lemon (peeled and seeded) Handfuls: parsley, cilantro and kale

Optional Ginger Garlic Avocado Jalapeño

Use any other veggies you may have on hand. I often include squash (summer and zucchini), broccoli, sunflower sprouts, and any other sprouts. Be creative. Apples will sweeten if needed and they combine well with all veggies.

1 Comment

Comment

Raw Banana Mango Nut Cream Pie

This Raw Banana Mango - MacNut Pecan Cream Pie is just coming out of the dehydrator after a 3 hour bake at 115 degrees. The pie pan is layered first with sliced bananas, then sliced Mangos. After those two layers of luscious fruit, then another layer with another row of Bananas. Make sure you bring the bottom layer of sliced bananas all the way to the top of the dish (see pic).

For the cream filling, mix 1 cup soaked Mac Nuts and 1 cup soaked Pecans together with the following:

1 tsp vanilla + 5 soaked Medjool dates (with the soaking juice) + enough water to make a nice creamy texture.

Spread on top and dehydrate for about 3 hours. Then place 1 - 1/2 cups un-soaked pecans in 1/4 cup honey water with 1/2 tsp Nama Shoyu or Tamari. Toss until glazed and then spread on top of the pie in a beautiful spiral.

Refrigerate for a couple hours before serving............and enjoy!!!

Comment

Comment

Strawberry, Lilikoi and Banana!

Strawberry Papaya Lilikoi Banana

Put them together and what do you have.......a delicious and nutritious breakfast or snack!

The other day a friend brought me all of these and I have been enjoying them together. This is one of the brightest strawberry Papaya's that I ever cut open. And, since it is Lilikoi season, I put Lilikoi on everything. What's even better is that everything is local!

Seed the Papaya, fill with chopped banana and top with Lilikoi. Yum!

Comment

Comment

Raw Pineapple Berry Pie

I am off to Oahu tomorrow to give a class for the Vegetarian Society on Saturday night. Just like last night's class on Maui, I am going to make this luscious Pineapple Mac Nut Pie with fresh Lilikoi sauce to top it off with. The pie has a crust of walnuts, pecans and dates. The filling is made from local mac nuts, fresh lemon juice, pineapple, vanilla and coconut oil. I bet you want the recipe, right? OK, here it is:

Pecan/Walnut/Date Crust

1 cup Pecans (soaked and rinsed)

1 cup Walnuts (soaked and rinsed)

6- Dates (soaked-save soaking juice)

¼ tsp Vanilla Extract

¼ tsp Sea Salt

Combine above ingredients in a food processor with S blade until it balls up. Remove and press into pie pan. Dehydrate for 5 hours or chill.

Pineapple Mac Filling

1 ½ cup Mac Nuts or Cashews (soaked)

4 cups Fresh Pineapple (chopped)

¾ cups Raw Honey or Maple Syrup

1/3 cup Fresh Lemon Juice

1 tsp Vanilla

½ cup Coconut Oil

2 tsp Agar Agar

½ tsp Salt

Mix all ingredients together, mixing until smooth. Mixture should be thick and creamy. Pour into pie shell and chill or or serve immediately and enjoy. If not, add a little more Cacao Powder, which means you may need to add more sweetener, depending on your taste. Place in paper cups and/or arrange on a plate. Cover and place in the refrigerator so the candy can firm up

Fruit Topping

Top the pie filling with fresh fruit. Berries are great unless you have seasonal or tropical fruit like mango, bananas and papayas. Or make a Lilikoi sauce to pour over!!!

Comment

Comment

My family won't eat Raw! What to do?

I received the following question from Heidi, a mother in the US who just purchased the DVD's.  My answer follows her question below:

Hi Susan,

I was hoping to ask you a couple of questions.  I have really been enjoying all of your recipes very much.  I wish I could say the same for my family.  So far they have all voted against us all moving towards a raw food diet.  My husband thinks I have gone off the deep end and my 16 year old, my 9 year old and my 1 1/2 year old are all terrified to see what our next meal will be made of.  It is disheartening and very stressful for me to work so hard to make these meals (with a 4 month old and 1 year old pulling at me all day long and crying every time I am in the kitchen) to have my whole family not like them and request a second dinner of food they do like.  I feel like I will have to always prepare 2 meals from now on... one for them and one for me.  I want to live this raw food lifestyle for health reasons for myself and preventative measures for my family for possible future illness.  I am finding it to be a very difficult way to eat so far (with my 2 little ones constantly pulling on me and the limited raw food supply here where I live etc.) but I do believe the end result for me is worth it completely. Do you have any suggestions?

Secondly I was wondering why you cook and or bake your vegetables and eat bread that has been baked?  I have purchased a few other raw cooking books and they both say that NOTHING should be heated over 112 degrees.  They say enzymes are killed after this heating point. I am confused.  What is your opinion on this?

Thank you so much for your time!!

Heidi


Dear Heidi,

Your questions and your challenges are common I am sure. First, a little history. I created Essential Cuisine out of my own experience with food. In 1990 I became raw and remained Raw for 2 years. Then I started incorporating cooked food, out of convenience mostly as I traveled a lot. I continued my nutritional studies as I experimented with my own body. Within a few years of eating only raw and some cooked I began to get ill (fatigue and some skin issues) and also bone loss. Through my studies and 15 years of attending Natural Food Shows and many lectures on food and nutrition, I broadened my experimentation into eating some animal foods - mostly dairy and always raw.

After many years of studying a vast body of nutritional/culinary information I became confused. My body became my best teacher. My bottom line is now this: A good blend of Raw, Cooked and Cultured foods works best for me and many others. It keeps me nourished while I can still cleanse and fortify at the same time.  If you study our indigenous cultures and also those cultures whose elderly live to be a healthy 100 years old, you will find that their diet is full of  local fresh foods, both cooked and raw.  And, they all have a naturally fermenting food in their diet such as a kefir, yogurt, cultured veggies, or grains. Naturally fermented "live" cultured foods are vital for any diet. Particularly if you are eating cooked foods and animal products. Fermented foods rich in probiotic bacteria and tons of enzymes (live cultured foods) will help greatly in building the friendly flora needed in the gut for digestion and proper assimilation, thus building immunity. I think putting these kinds of living foods in the diet are more important than whether your food is raw or cooked.

Many cultures eat a primarily "cooked" food diet and do quite well (India). In fact, many health practitioners think some foods are better for you cooked.  Think about it this way. Would you be able to eat an adequate amount of mung beans or lentils if they were raw? Probably not. Cooking them allows you to eat much more of these fabulous foods, plus science is showing us that they are healthier when cooked. Also, consider vegetables. Many people do not like veggies and will not sit down to eat a huge bowl of them chopped raw. But, you can cook them slightly and put a great (raw) sauce on them and suddenly, you can eat more and they taste much better.

The answer as to why I prepare/teach/eat cooked foods along with raw foods is that I don't have a belief that people should eat only raw. Yes, enzymes may be lost, but that is not the only criteria for healthy food. My motto is to eat from the Earth and not the factory, and if you are going to eat animal foods, make sure the animal is as healthy as you want to be. Dairy is best raw. As for meat, grass fed is best. You can read about both of these concepts on my blog under articles.

As for your family I would not recommend trying to take them all the way to raw foods is there is resistance. First thing to do is to take all processed foods away and make lots of "natural - whole" foods available. You can mix raw and cooked foods together. This is in Essential Cuisine.

Make sure your fats are kept raw. In other words, do not cook with them. Use olive oil and high quality flax and coconut oils available for topping and/or sauces and dressings for cooked foods. Make the same foods your family loves, but use better ingredients. For instance, if your kids like pizza, then use a whole wheat pizza dough and top with fresh veggies. You can get lots of fresh salads with good dressings in their diet in any way that works. Give them what they love and then add in more nourishing whole foods. Luscious smoothies and lots of good juices can be beneficial. Soups are wonderful too. When cooking grains or veggies, remember low and slow is best. Raw food desserts is a great way to satisfy a sweet tooth.

It is not easy to transition someones diet especially when they do not want it. I have total compassion for what you are going through. My son was a rebel with me, and he really needed to stay on a very clean diet. He could not tolerate sodas, candy, pasteurized dairy, food chemicals, dyes, preservatives or foods with lots of sugar in any form. This is what you want to steer your family away from. If most people would just take processed foods, sugar and bad fats out of their diet their health would improve enormously. This is where I would start. Remove the junk and replace with whole foods. That is why I made sauces and dressings and showed you how to use great fats on ordinary foods. My methods do not take a lot of work. You can create your own seed milks too, and use them for smoothies and even boxed cereal if necessary.

Cook rice, potatoes and other whole foods and top with high quality fats and seasonings. Get creative in blending some of the ideas in a la Oils. This way you can bring your family along slowly and keep peace and joy in the house.

Meal time is extremely important for bonding and family time. The family must be nourished with joy as much as nutritional value. It won't work to push foods on them. Instead incorporate them into your meals and improve the quality of what your family members love.

I think you have asked a big question that many people have. Perhaps we can continue to discuss and find ways to keep it moving in a positive way.

Many blessings, Chef Teton

Comment

3 Comments

First Greens of the Day! Have a Green Smoothie

Ingredients to Morning Smoothie

Today I made a delicious Green Smootie. I make them daily and encourage you to do the same. Why? Because they are the very best way to get those veggies in you and working all the magic that they can do for your body.

Personally I do not like Kale very much, but it is so full of calcium and other dynamic photo chemicals. So, I blend it - or puree it. I add celery, cilantro, parsley, cucumber and a local meyer lemon. Sometimes I add some ginger and other veggies like beets and carrots.

Now this may sound a little tart to you, but I like it this way. If you want it to be a little sweeter, then add a juicy apply or pear (pear tastes awesome).

I make an entire blender - mine is a Vita Mix - full and then store it to have for the next day. To store, pour in glass jars and add a few drops of hydrogen peroxide to help preserve it.

Enjoy at least 4-6 ounces two times a day. The next day you will have it all made and then you only have to make it every other day. Now think about it would you eat this many vegetables within a day or two. Probably not, so go for it. It is so simple, so refreshing and a great way to get your 5 a day!!!

3 Comments